


CZ Shadow 2 Magwell Installation Guide: Step-by-Step
A magwell on your CZ Shadow 2 is the single most impactful upgrade for competitive IPSC shooting. If you're serious about improving your reload speed and consistency under pressure, installing a CZ Shadow 2 magwell will make an immediate difference. Reloads become faster—dropping 0.3 to 0.5 seconds off your time—and fumbles during high-stress stages nearly disappear. The good news: you don't need a gunsmith. With just 15 minutes, a 2.5mm hex key, and our step-by-step guide, you can install a magwell yourself. Whether you choose brass for the weight benefit in Standard Division or aluminium for pure speed, this guide covers everything you need to know about CZ Shadow 2 magwell installation and getting your gun running competitively.
Why Install a Magwell on Your CZ Shadow 2?
The difference a magwell makes on the clock is undeniable. Most competitive shooters see a 0.3 to 0.5-second improvement per reload—which adds up fast over a match. But speed isn't the only benefit.
Reload Speed Improvement
The funnel shape of a magwell guides the magazine into the well cleanly, eliminating the fumble and adjustment shots require without one. Your hand knows exactly where to put the mag, and your eyes stay downrange. In matches, that consistency is worth gold.
Fumble Reduction Under Stress
Match stress happens to everyone. Your heart's pounding, the stage timer's running, and suddenly standard grip placement feels uncertain. A magwell catches your magazine even when your reload isn't picture-perfect. You're still moving fast, but the magwell adds a margin of error you won't get from the factory grip alone.
Weight Distribution Benefits
This is where material choice matters. A brass magwell adds weight low in the gun, which lowers your centre of gravity and reduces muzzle flip between shots. In Standard Division, that means tighter splits and faster target transitions. Aluminium magnets keep the gun lighter for shooters who prioritise overall speed and mobility.

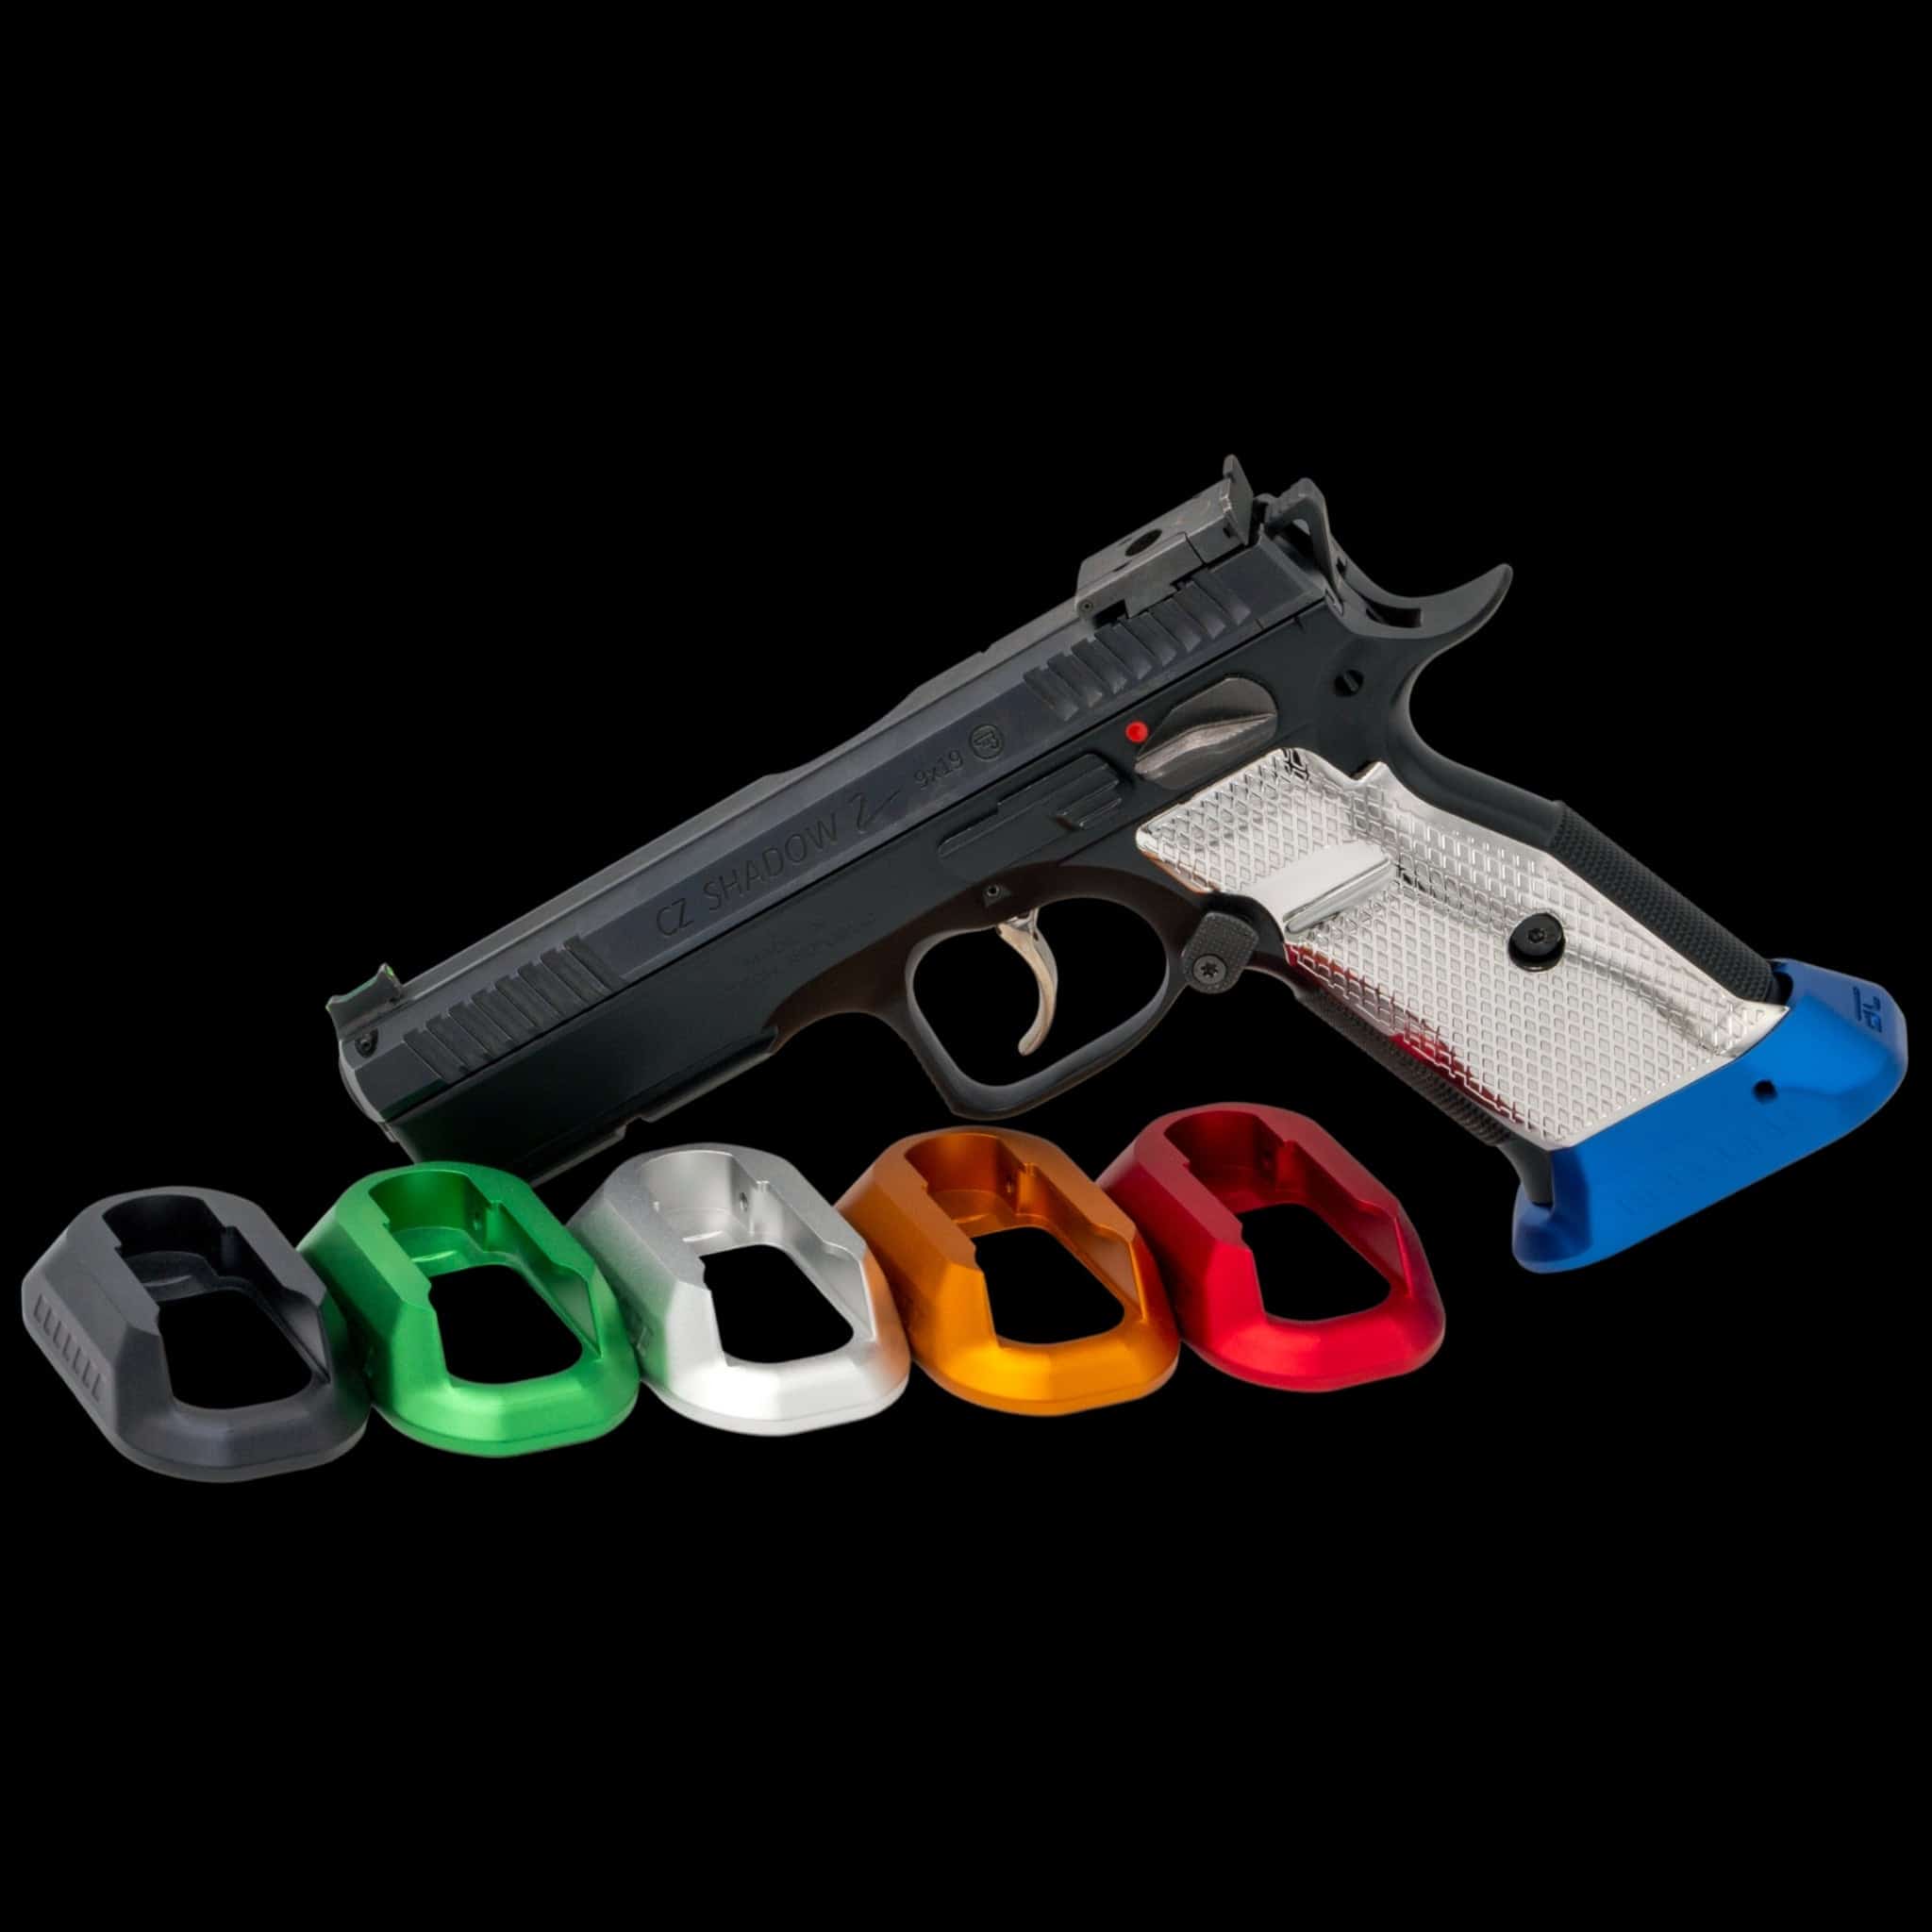
Brass vs Aluminium Magwell — Which Should You Choose?
Both materials work brilliantly on the Shadow 2, but they suit different shooting styles and division regulations. Here's what you need to know:
| Feature | Brass Magwell | Aluminium Magwell |
|---|---|---|
| Weight | Heavier (lowers CoG) | Lighter (faster overall) |
| Muzzle Flip Reduction | Noticeable improvement | Minimal (lighter platform) |
| Feel | Premium, solid grip | Fast, responsive feel |
| Best For | Standard Division (weight benefit) | Speed-focused shooters, all divisions |
| Price | $149.99 | $139.99 |
| Durability | Excellent, no wear issues | Excellent, corrosion-resistant |
Division Compliance Note: Both brass and aluminium magnets are legal in Standard and Open divisions. They're absolutely not allowed in Production Division. Check your local rules before competition.
If you're shooting Standard Division and want every advantage the rulebook allows, go brass. The weight benefit is real, and the improved recoil control compounds across an entire stage. If you want the fastest possible reloads without worrying about extra weight, aluminium is your choice. Many top shooters split the difference and run brass when they know the stage requires sustained speed, and aluminium when they want absolute mobility.
Tools Required
Installation requires almost nothing, and you likely have most of this at home already:
- 2.5mm hex key (Allen key): This is the only critical tool. It removes and installs the grip screws.
- Blue Loctite (threadlocker): Keeps screws tight under recoil. A small bottle lasts forever.
- Clean cloth: Wipe the mounting surfaces before installation. A paper towel works.
- Punch or small flathead screwdriver (optional): Helpful if the factory lanyard loop is difficult to remove, but usually not necessary.
Important: Do not use red Loctite (permanent threadlocker). Blue Loctite is removable if you need to take the magwell off later. Red Loctite makes removal nearly impossible without destroying the magwell.
Time required: 10–15 minutes. This is a straightforward job. No gunsmithing experience needed.

Step-by-Step Installation
Clear and Safe Your Firearm
This is non-negotiable. Remove all ammunition from the area. Verify the magazine is empty. Manually cycle the slide to ensure there's no round in the chamber. Point the gun in a safe direction and double-check one more time. Safety first, always.
Remove Existing Grips
Use your 2.5mm hex key to remove the two grip screws—one on each side of the gun, near the front of the grip. Turn counterclockwise until the screws are fully out. Keep them somewhere safe (a small cup works). Carefully slide the grips off. They'll come away cleanly.
Remove the Factory Grip Plug or Lanyard Loop
Look at the bottom of the grip area. You'll see either a grip plug or a lanyard loop held by two small screws. Remove these screws with your 2.5mm hex key. The plug or loop will come away. Set it aside—you won't need it once the magwell is on.
Test-Fit the Magwell
Hold the magwell up to the gun and check that it aligns properly with the grip mounting holes. It should sit flush against the bottom of the gun. If it doesn't sit flat, stop and check alignment carefully. You want it seated perfectly before you apply threadlocker.
Apply Blue Loctite to Mounting Screws
Put a tiny amount of blue Loctite on each mounting screw—just a small dab on the threads. A thin coat is enough. Too much threadlocker makes the job messier and doesn't improve holding power. You're not trying to glue the screw in; you're just locking it against vibration.
Attach Magwell and Tighten Screws Evenly
Position the magwell against the gun and insert both screws. Start both screws by hand first to make sure you're not cross-threading. Once both are started, tighten them evenly in an alternating pattern—a quarter turn on the left, then a quarter turn on the right. This ensures the magwell sits flush and doesn't tilt. Tighten until snug, then give each screw one more gentle quarter turn. Don't muscle it; the Loctite will do the holding.
Re-Install Grips
Slide your grips back onto the gun. If you're using standard CZ grips, they might be slightly tight with the magwell in place—this is normal. Make sure the grips sit flush and that the magwell funnel isn't blocked. We strongly recommend using magwell-compatible grips like our Boss G10 Palm Swell Grips, which are cut to work perfectly with magnets and won't interfere with magazine insertion.
Function Check
With the gun cleared and unloaded, test magazine insertion. Drop a magazine into the magwell several times. The magazine should snap in quickly and seat fully every time. Push the magazine release and verify the magazine drops cleanly. If anything feels binding or difficult, stop and double-check that the magwell is seated correctly and the grips aren't interfering. Once everything works smoothly, you're done.
Critical Safety Reminder: Never work on your firearm when there is any possibility of ammunition being nearby. Always verify the chamber is clear before and after installation. Test your function check only with an unloaded gun in a safe environment.
Common Mistakes to Avoid
Most installers get this right the first time, but here's what to watch for:
Using Red Loctite Instead of Blue
This is the most common error. Red Loctite is permanent and nearly impossible to remove. You'll destroy the magwell trying to take it off. Always use blue Loctite. It's removable, perfect for this job, and widely available.
Over-Tightening Screws
The aluminium and brass magwells have softer threads than you'd expect. Over-tightening can strip the holes, and then the magwell won't sit tight. Tighten until snug, then stop. The Loctite does the work, not muscle.
Not Checking Grip Compatibility
Factory CZ grips sometimes bind when a magwell is installed. Before you assume the magwell is wrong, verify that your grips aren't interfering. Magwell-compatible grips eliminate this issue entirely. If you're planning to keep factory grips, test-fit them carefully during installation.
Forgetting the Function Check
Always—always—test magazine insertion and removal before calling the job done. A smooth, reliable function check is your confirmation that the magwell is installed correctly. If magazines don't snap in cleanly, something isn't seated properly.
Magwell-Compatible Accessories
Once your magwell is installed, these accessories enhance reliability and speed further:
Magwell-Compatible Base Pads
Magazine base pads designed to work with magnets sit lower and let you use the magwell funnel to its full potential. Our CZ Shadow 2 Magazine Base Pad ($39.99) is cut for magwell operation. If you're running Mec-Gar magazines, our Mec-Gar CZ Shadow 2 Aluminium Basepad ($35.99) and Brass Basepad ($39.99) pair perfectly.
Palm Swell Grips
Our CZ Shadow 2 G10 Palm Swell Grips ($99.99) are specifically designed to work with magnets. They won't interfere with magazine insertion, and the palm swell improves your grip during rapid fire. They're worth every dollar if you're serious about your setup.
Extended Magazine Release
Our CZ Shadow 2 Extended Magazine Release ($49.99) pairs naturally with magwell upgrades. A larger release button means faster magazine ejection, compounding your reload speed advantage.
IPSC Division Compliance
Before you install a magwell, confirm it's legal in your division. Rules vary, and running an illegal magwell costs you the stage.
Production Division
Magwells are NOT allowed. Production is designed around standard equipment. If you shoot Production, you'll need to skip the magwell.
Standard Division
Magwells are ALLOWED. This is the most common division for magwell use. The weight benefit of a brass magwell is especially valued here.
Open Division
Magwells are ALLOWED. In fact, Open shooters often pair magnets with other modifications for maximum performance.
USPSA Equivalent Note: USPSA divisions mirror IPSC rules. Confirm local match rules before competition—some smaller events have variations. When in doubt, ask the match director.
Complete Your CZ Shadow 2 Setup
A magwell is just the start. If you're upgrading your Shadow 2 for competition, consider our combo packages, which include magwell-compatible grips:
- CZ Shadow 2 Grips & Aluminium Magwell Combo — $219.99
- CZ Shadow 2 Grips & Brass Magwell Combo — $239.99
- CZ Shadow 2 Pro Performance Kit — $215.99
Or build your own setup with individual products. The combo packages bundle popular components and save you money versus buying separately.
Frequently Asked Questions
Conclusion: Get Your Magwell Installed Today
A CZ Shadow 2 magwell installation is one of the highest-return upgrades you can make for competition shooting. Faster reloads, fewer fumbles under pressure, and improved recoil control add up to real stage times and match placement. The installation itself is straightforward, quick, and well within reach of any shooter willing to spend 15 minutes and follow a clear guide.
Whether you choose brass for maximum weight benefit or aluminium for pure speed, pair it with magwell-compatible grips and base pads for a setup that runs flawlessly. And remember: always verify that magnets are legal in your division before competition.
Ready to take the next step? Browse our full range of CZ Shadow 2 upgrades and get your magwell installed this weekend.
Shop CZ Shadow 2 Magnets NowRelated Article
Want to explore more Shadow 2 upgrades? Check out our comprehensive guide: Best CZ Shadow 2 Upgrades for IPSC Competition. It covers everything from triggers and sights to grips and extension kits—your complete roadmap to a competition-ready Shadow 2.

